Adding convincing detail to your form without losing that sense of volume
Our natural inclination is to go for the detail. After all it’s why we want to paint the animal in the first place. As wildlife artist’s we are attracted to the beauty and patterns we see in our subject. The detail and colour of the feathers, or the textures and rhythm of the fur. Who would not be inspired by the myriad of crusty wrinkles on the skin of a bull elephant bathed in light.
Well, these are all important reasons for doing the artwork, however they are the last thing we should consider when beginning our painting or drawing.
Adding convincing detail relies completely upon maintaining a convincing sense of volume to the form underneath.
You must never sacrifice solidity to detail!
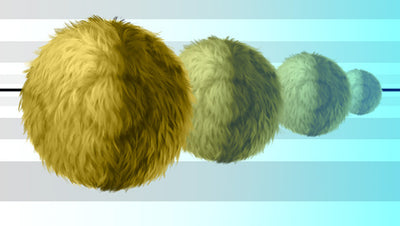
Our goal is to produce a solid form that in this ‘species’ of ball has a pronounced furry texture. It will be in bright sunlight and have lot’s of textural detail in the fur.

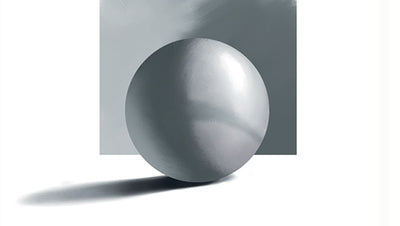
Our initial step, Figure (A) is always to establish the quality of our light source. In its simplest form this is revealed to us as one big light shape and one big dark shape. Squinting your eyes down will help to diffuse the detail you see and help you assign the myriad of little lights and darks into the light family or the dark family.
The tonal difference between these two tones will establish the strength of that light source. The stronger the contrast, the brighter the light (e.g. sunny day), the closer the tones the duller the light (e.g. overcast day).
Also in this stage, the surface texture of the ball can be hinted at, by observing the quality of the edges, particularly the shapes formed where light meets shadow. If we take the time to carefully observe these two areas, it will become evident that with just two tones we will have successfully given our ball a suggestion of fur in a specific light.
Adding the half tone darks.

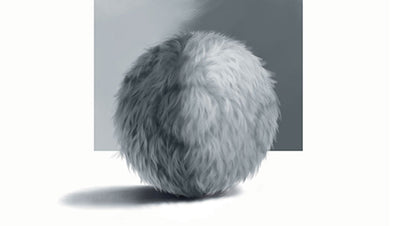
In Figure (B) we take our great start and begin to model the form and indicate the initial texture of the fur. We are adding just one half tone dark to the light side and one half tone dark to the shadow side.
This is not a tutorial about how to paint fur however some things are worthy of attention at this stage of our painting. They may be applied through out the course of the painting and will assist in emphasizing volume and in defining the details.
- I have always used a simple sculpting analogy when developing my half tone shapes. Think of the darks as if you were carving into clay to create a depression and the lights as if you are adding clay to build on the form.
- The directional lines of the shapes in this case, fur, can be used to imply the shape of the form underneath. Notice in the case of our ball that the negative and positive shapes made by the fur are brushed in arching curves around the shape of the ball. If your marks were simply up and down or sideways the sense of volume would not be accentuated. Make your shapes indicate the shape of the form.
- Use perspective to enhance depth on your ball by varying the size of your shapes and brush marks as they move around the form. Larger for those shapes closer to you and progressively smaller as the form moves away.
- Overlapping of shapes helps also with the impression depth.
- As edges of tones move away towards the edge of the form they can be made subtly softer or slightly out of focus.
- Although not evident in our illustration, colour can be used to enhance that sense of volume. A phenomena of colour is that warm colours tend to come forward and cool colours, recede. So why not add some subtle, colour temperature shifts as the form turns away.
We can continue to play with these half tone shapes as much as we like until we have a pleasing indication of the fur. The most important thing to remember is not to go too dark, especially in the light side. Maintain the relationship of these half tones to their respective families. If you squint down you can see that all the details we have created remain in the light and in the shadow.
Adding the half tone lights.
An enduring lesson I learned was that, the darks give you the likeness, the lights give you the character.

Figure (C) shows us building on our solid indication of fur structure, developing steadily towards the highlight with layers of textural half tone lights.

Figure (D) shows the development of the shadow side with the addition of the reflected lights. These half tone lights in the shadow are caused by light from surrounding surfaces reflecting into the shadow side and acting as a secondary light source. They are a great way to indicate texture and detail in the shadow side. However they are very subtle lights and must always remain in the shadow family.

Figure (E) illustrates some markings that are typical of this ‘species’ of furry ball. It also shows how patterns can be used to emphasize form, by following surface contours.
Most importantly, note that even though the markings are locally the same dark grey, they are lighter or darker visually, depending on the tonal mass in which they sit.
It is a curious thing, the temptation to place too many strong darks in the light side and too many strong lights in the dark side. We do this because we want our details to ‘pop’ and appear real. All we succeed in doing is destroying our sense of volume. The most important thing to remember is that we must avoid placing tones in the light side that belong in the dark side and visa versa. As a rule of thumb, make darks on the light side lighter than they appear and lights on the dark side darker than they appear.
If you maintain this mantra throughout your painting you will go a long way towards achieving beautifully solid and detailed shapes. Enjoy your painting!